
Wednesday, July 29, 2015
Kitchen Dreaming
DIY Painted Basket
I love TJ Maxx Home Goods and I
don't care who knows it.
There. I said it. I have an
addiction. And I don't wanna quit it. (But don't tell my husband that. Let's
just pretend I'm on the 12 step program when he's around, mmmkay?)
This weekend I talked the Mister
into taking me to our local Home Goods under the pretense of looking for a
basket to store all of our living room throw blankets. Am I the only one with a
throw blanket addiction? As always with Home Goods, I found exactly what I was
looking for.

But the basket was missing
something. A little... pizazz. I wanted a basket with jazz hands.
So I dragged out my acrylic craft
paint, turned on my audio book (The Goldfinch, anyone?) and got to work
painting my basket. I was hoping to make this a basket painting tutorial at
first, but then realized there are really only two steps. Step 1 - get a
basket. Step 2 - paint your basket.
Never fear though. I won't leave you
with an empty basket, a paintbrush, and dread in your hearts. I did find some
helpful tips along the way:
- Use a basket with a large weave. Trust me, you don't want the heartache of trying to paint teeeeeeny tiny basket weave and stressing yourself out about getting paint on EVERY OTHER PIECE. Cuz it'll happen.
- Additionally, put your inner perfectionist aside and try not to stress about painting inside the lines. You'll get paint on weave where you didn't want paint. It will happen. But it will also be ok. This is supposed to be a rustic, hand-painted basket. Keep repeating that to yourself.

As you can see, I have a lot in
common with the Impressionist painters. Up close, my painting is a hot mess.
- Have some idea of where you're gonna go. You can paint multiple lines of weave at a time, just one line, alternate colors... Just have a plan, man.
- If a color doesn't look good - DON'T. PANIC. It's ok. Just pick another color and paint over. Ain't nobody gonna know.
- Lastly, don't underestimate negative space. Leaving some of the basket unpainted is totally fine. In fact... it even looks GOOD. I promise.
Sunday, July 26, 2015
We're Hog Wild for...
Just a few home items we're totally crushing on right now.
1. This candle
from DW Home. We found ours at Home Goods for a steal. Musky and earthy
with an amber/cedarwood quality. Aromatic enough for the ladies, manly
enough for the gents. Truly the goldilocks of candles.
2. This DENY for Anthropologie
duvet cover. We're getting ready to redo our master (some day) and this
is definitely on our wish list. I just wanna climb in and take a nap
now please.
3. White Buffalo Styling Company's
kitchen redo. White kitchen's make me swoon. And that living wood
countertop? Be still my heart. Top it off with a vintage Kilim rug and I
just can't.
4. Speaking of Kilim rugs... this version from World Market is ahhh-mazing. And just a fraction of the cost of a real vintage one. We may or may not have snatched it up for our front porch redo. Meaning we absolutely did. Can't wait for you to see it in our upcoming front porch reveal!
5. These transom window house numbers from House Number Lab almost make me wanna rip our front door and install a transom window just so I can have them. Almost.
 |
| DW Home - Warm Tobacco Pipe Candle photo source |
 |
| DENY for Anthropologie Iveta Abolina duvet |
 |
| Kitchen via The White Buffalo Styling Company |
 |
| World Market Blue Odina Kilim Indoor/Outdoor |
4. Speaking of Kilim rugs... this version from World Market is ahhh-mazing. And just a fraction of the cost of a real vintage one. We may or may not have snatched it up for our front porch redo. Meaning we absolutely did. Can't wait for you to see it in our upcoming front porch reveal!
 |
Friday, July 24, 2015
Think you have a bad kitchen?

But that is not what we were left with when we purchased our home. The listing for our house highlighted that we were getting an "Eat in kitchen!"
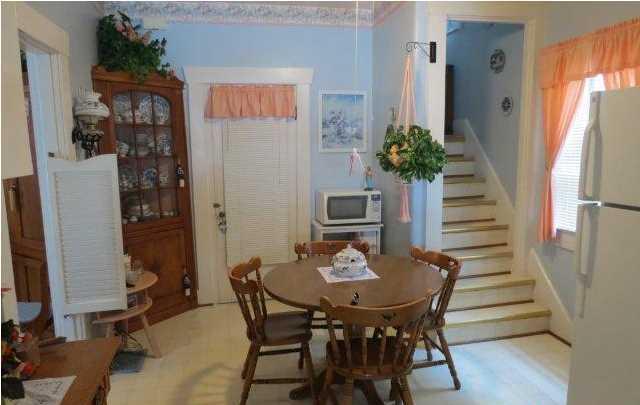
Upon closer inspection, you may realize this small space is has two doorways, a window, and a charming split staircase to the second level. Where is the counter space? The range? A sink? Right behind the photographer:

That's a 7x7 space housing an original 1950's range and double washboard sink. What could we do with an awkward 11x11 room with another 7x7 room added on the end of it?
Lets start out with our list of wants for the space:
- Dishwasher (not named Ross)
- A half bathroom - our only bathroom is on the second floor... and looks like the kitchen
- A pantry - we have been keeping food in that wall cabinet you see to the right.
- Counter space - our kitchen has about 18 inches
- Lots and lots of cabinets!
- A design that works well for entertaining
 |
| Floor Plan |
 |
| Looking at it from the dining room |
 |
| Looking at it from the 11x11 room |
Having a design that is both easy to cook in and great for entertaining isn't easy because you have to give the cook room to work and company space to congregate. What we decided on was making the smaller area of the kitchen the main food prep and cooking area. With the addition of a prep sink and pullout waste bin, the smaller portion of the kitchen can handle some serious cooking! This area of the kitchen is complete with:
- A 36-inch Range
- 18-inch prep sink with pullout waste bin
- 7 feet of counter space!
- Easy access to the Pantry and Refrigerator
The location of the powder room off the kitchen was a necessary evil. We played at moving the powder room in other locations but there were too many existing doors and windows to squeeze it in anywhere else. Luckily, in our neighborhood with century old homes, powder rooms are often off the kitchen so it doesn't seem strange.
 |
| Room for work and fun |
The flow from the main living area and dining room makes the kitchen a central gathering area. Friends and family can hang out in the larger section of the kitchen during parties without getting in the way, and we managed to tick off all the points on our wants list!
Look out for our next post: Coming up with what we wanted the kitchen to actually look like. Colors, what brand of cabinet, door style, counter tops; the kind of decisions people spend moths on Houzz agonizing over, and that little problem of budget.
Thursday, July 23, 2015
The Mid Century Modern Sofa Table Project
Our first DIY furniture project was a midcentury modern console table. Right now it lives n the smallest area of our house- our entryway. But we still get tons of compliments and questions about it! Everyone always asks where we got it. Normally I wouldn't do a blog post on a piece of furniture I couldn't give you assembly pictures for (since we built the table pre-blog), but so many people have commented on the table while visiting our house, I'll give it a try!
 |
| This was the original inspiration for our sofa table |
Jenn first found the original inspiration table on Etsy. However, that table wasn't quite the right size for the space. And it was WAY out of our budget. (My wife has champagne taste. She says it's part of her charm. I think she should just learn to like beer.)
Even though the price wasn't right, the style was. We love the sleek, modern lines of MCM furniture and totally dig the little quirk and touch of originality it brings to a room. So after studying the inspiration photo for a while, we got to work! We began by measuring the space in our entryway and determined the ideal size for our version of the table should be 48 inches long by 36 inches tall and about 12 inches wide.
I used some graph paper to make sure 48 in. x 36 in. was close to the original proportions of the Etsy table (thus keeping the overall shape and design). Those dimensions worked for us, but you may want to tweak it for your space. For our table it took:
Materials List:
- 2 - 1” x 12” x 8’ (1x material is actually 1-3/4 thick)
- 24 - 1-¼” Kreg Screws
- Your Choice of Stain (we used Zar "Moorish Teak")
- Your Choice of Poly
- 4 - 8” midcentury modern legs*
- 4 - Angled leg fasteners*
- 4 - Waddell 8 inch round taper table legs
- 4 - Angled Mounting Hardware
- Kreg Jig Mini
- Circular Saw
- Electric drill/driver
- Kreg Square Cut
- 2 - 24" Clamps
- 3 - ¾” x 12” x 48”
- 4 - ¾” x 12” x 14"

Step 3: Start by building the bottom or base of the
table first. The legs will eventually attach to this piece, so we
recommend using the piece with the most imperfections. Place the piece
so the imperfect side is facing down. One of the 14-inch pieces will be
flush with the end of the long (48-inch) board while the other one
should be set in from the opposite side 8-1/2 inches. Clamp your 14-inch
pieces at a 90 degree angle to the 48 inch piece (base of the table)
and use the 1-1/4 inch Kreg screws to join the the pieces.

Step 4:
Place the second 48-inch board on top of the two 14-inch boards you
just joined. Use the Kreg screws to join the second long board to the
top of the two short boards.


Step 5: Reverse
the layout from step 3. Join the next two 14-inch vertical pieces
opposite the position they were joined in step 3 to give the "stair step
effect". Once again, one short board should be flush with the end of
the long board while the other will be set in 8-1/2 inches.

Step 6: Since
this piece will be the top of your table so we suggest picking the
piece with the least amount of imperfections. Place the most perfect
side facing up. This will be the top of your table. Join the long board
to the two short boards and the body of your table is finished!

Step 7: This
is one of those steps that we wish we had pictures for, but its pretty
easy. We found the dowels were too long because they are made for 1-1/2"
material. So first, we cut the dowels in half, then put a little dab of
glue on them before sliding them into the pilot holes over the screws.
If there is more than a penny's width of excess exposed, use a flush cut
saw to cut off the excess. Sand and put on a little wood filler if you
are not satisfied with how it looks.
 |
| Image via Kregtool.eu |
Step 8:
It’s time for some sanding. We used 80 grit sand paper on a vibratory
palm sander (aka - quarter sheet sander) to round off all the sharp
edges and give the table a more polished look. We then progressed to 120
grit sand paper and 180 grit paper for the final finish. Make sure to
sand the table consistently, don’t spend too much time on one spot
because over sanding will start to close the pores in the wood grain and
there will be a light spot when it’s stained. You can go ahead and sand
your table legs while you have your sander handy, but don’t put them on
the table yet!


Step 9: After
sanding, it’s time for some stain. Jenn and I really like the Moorish
Teak stain by Zar that we used. We have used it on just about every
project since! If you went with pine for your table, you might want to
apply Minwax wood conditioner before staining. Pine often comes out a little blotchy if its not conditioned first. The wood conditioner is the only Minwax product I recommend! I always have had a hard time getting the stain to come out consistently because it penetrates the wood so quickly. I’m a big fan of Zar stain because it’s a little thicker and much easier to apply a consistent coat. It’s water based to so you can clean up without mineral spirits.
Step 10: Apply some poly. Polyurethane protects your new piece of furniture and gives it a little gloss for a finished look. The key to making your poly job look professional is to very lightly hand sand between coats with 400 grit sand paper. Watch some You-Tube videos! Once again, I recommend Zar polly. We used their antique flat variety as it protects our awesome new entry table without making it stand out from our 1900s home.
Step 11: Attach the angled mounting plates and table legs. You can play around with the table leg placement. We ended up placing our plates about 2-¼ -inches from the each end and 1-inch from the side so you cannot see the mounting hardware.

After attaching your legs, stand back and admire your handiwork. We sure did! Can you believe how fast this table comes together and how impressed all your friends will be? As soon as we finished ours, Jenn got right to work styling it with a rustic catch-all key bowl, some vintage books and bottles, and our favorite find - a T-Rex skeleton model! Will dinosaurs ever stop being cool? We don't think so.
We positioned our table in prime viewing position right under our mixed metallics gallery wall (tutorial coming soon!)

Sunday, July 19, 2015
Sunday Supper - Barbecue Tofu Quinoa Bowls + Weekly Menu
Whenever anyone finds out that we're meat free at home they always want
to know what we "miss most". As in "You MUST miss... hamburgers!" You've
obviously never had a killer black bean burger. "You MUST miss...
barbecue!" Let me introduce you to my friend - Barbecue Tofu Quinoa
Bowls.

1. Make the slaw

Check out our weekly menu plan below.
These
bowls are high in protein with all the flavors of summer. Make it for
your most die-hard meat eating friend. On second thought, maybe you
should just eat all of it. #treatyoself
Barbecue Tofu Quinoa Bowls
Ingredients
- 1 cup Cooked Quinoa
- 14 oz. Extra Firm Tofu
- 1/4 cup Barbecue Sauce + more for drizzling (we like Sweet Baby Ray's)
- 1 sliced Red Onion
- 1 sliced Avocado
- 2 cups Shredded Cabbage or Coleslaw Blend
- Juice of 1/2 a lime
- 2 tbs Apple Cider Vinegar
- 1 tbs Agave Nectar or Honey
1. Make the slaw
- Mix the lime juice, cider vinegar, and sweetener until incorporated. Pour over the cabbage. Let it sit and get all juicy and delicious while you get your BBQ on.
- Drain and press the tofu. Dry tofu is happy tofu. Cut your happy tofu vertically into 4 equal slabs.
- Heat your grill or cast iron pan until VERY hot. I mean screamin' hot. The hotter your pan, the crispier your tofu. Trust me on this one.
- Baste your tofu with BBQ sauce. If you like you can do this after cooking, but I prefer prior.
- Place the tofu on the grill or pan. Cook until crispy on both sides (approximately 5 mins per side depending on heat).
- After the tofu is cooked, cut into bite sized cubes.
- Start by placing quinoa in the bowl. Top with diced tofu, a scoop of slaw, some sliced avocado and red onion and garnish is with some pickles. We drizzled a little extra barbecue sauce over the whole thing. Cuz you can never have too much sauce. #realtalk
- Duh.
Check out our weekly menu plan below.
- Monday - Vegetarian Tikka Masala from A Beautiful Mess
- Tuesday - Baked Sweet Potatoes with (veggie) Sausages, Sweet Peppers, and Cilantro Sauce from Bev Cooks
- Wednesday - Tofu Scramble Pita Pockets (recipe to come)
- Thursday - Pickled Shrimp with Fried Green Tomatoes from The Food Network
Subscribe to:
Posts (Atom)